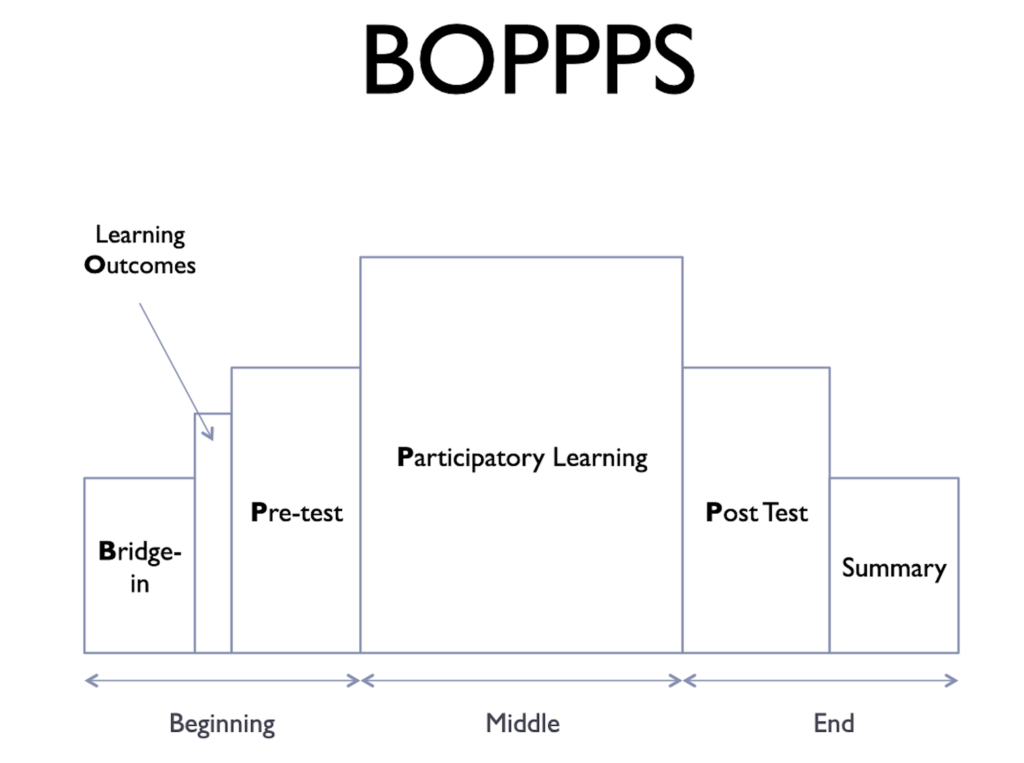
If you are using your synchronous communication time with your students to deliver content please STOP. There is a better way to use this valuable time. When you meet with your learners online in real-time, which is what synchronous communication is, you should be using this time to build your learning community NOT deliver content. Yes, you will be sharing information but you can do so in a positive way that will be engaging and will foster collaboration. Because of amazing technologies like Zoom, Skype, WebEx, Collaborate, Blue Jeans so so many more, you can get close to the level of engagement that you can have in your face2face sessions. At least you can if you use something like the BOPPPS model.
Rather than try to explain the BOPPPS model I will show you what it is and how it works with an actual recording of a Synchronous Collaboration session followed by a breakdown of how I used BOPPPS model components to keep my session participants engaged.
Power Video Synchronous Collaboration Session 1
Power Video Synchronous Collaboration Session 2
In addition to having a slightly larger group, in this second session also I sorted out the video issue I had in the first session. But with the video sorted out the Dave Hax How to Fold a Shirt is copyrighted to I had to trim out that content. The full video can be viewed below.
How I used the BOPPPS Model in the Power of Video Session
BOPPPS Model Details
Bridge-in (B)
- The bridge-in is partly for capturing a learner’s attention.
- Lao Tzu said, “You can no more teach without a willing learner than a merchant can sell without a willing buyer.”
- Aside from simply gaining attention, a bridge-in should ideally get students to want to learn.
Bridge-in (B) Techniques
- Tell a personal story
- Bring in a relevant newspaper article, website, video, device…
- State an interesting statistic
- Create doubt
- Create curiosity
- State a current problem
In the session main keynote slide the Can a Picture Say More than a Thousand Words? image and then the folding the shirt were all part of the Bridge In for my session. I used images, story and a problem followed up by a video to create an effective and powerful bridge. Just consider how you felt when you watch this folding the shirt video.
Learning Outcome (O)
It is always important to state or paraphrase the learning outcome – Use new media resources like video, audio, and images to enhance the learning environment.
Pre-Assessment (P)
- This step is intended to find out what your students already know. Why do this?
- What can you do with students who know a lot of the content?
- The questions you ask can be the same as you would do for the bridge-in. If so, what can you do?
- Use open-ended rather than close-ended questions in this step. Why?
- Brainstorming can also work.
I asked the following question as part of my Pre-Assessment:
What is the most popular search engine for North American’s 18 years and younger?
The answer was surprising for most participants because most people do not think of Youtube as a search engine and yet that is how it is used by most people. The answer to:
What is the second most popular search engine in North American?
should have been less of a surprise but most participants still thought about traditional search engines.
The key with the Pre-Assessment stage of BOPPPS to get a sense of where your audience is at and just how far you need to take them.
Participatory (P)
Active or participatory learning leads to “deep” learning; learning that lasts.“Surface” learning tends not to last.
Personal interaction with the content leads to personal/deep meaning.
Interaction can be between you and students or between students.
What are some activities you can do within a lesson so that you do NOT have a traditional “talk-only” lecture?
The participatory section started with a discussion about how powerful combining video with graphics and text to create and effective:
A series of slides were presented that led to additional discussions which are key to the participatory process.
The focus on the Participatory section is to get to the outcome which is:
Using new media resources like video, audio, and images to enhance the learning environment.
To ensure that the outcome was realized a short Post-Assessment participation section is facilitated and used to ensure that the key elements of the outcome have been addressed.
Post-Assessment (P)
- Assess whether your students achieved the outcome.
- Be sure you assess the outcome at the right level.
- If you teach with media and/or real objects, you probably have to test with them.
- What are some ways you can conduct a post-assessment? For example, ask for“muddiest” point.
- Give time to answer your question(s).
One of the best ways to stimulate effective discussion is to ask open-ended questions like:
Your Thoughts…?
What are the advantages of using video & media?
How do video and media enhance learning?
Summary (S)
- The summary concludes or wraps up the learning experience.
- A powerful teaching moment that is often omitted.
- It can help students reflect on and integrate the learning – leading to deep learning.
- What things can you do in a summary?
Summary (S) Techniques
- Content review by you or learners
- Helpful phrase to ensure it is useful: “The key points to remember are …”
- Weak: Today you learned about …”
- Students write a one-minute paper
- Recognition for effort/achievement
- Application – how to use this later
- Link to a subsequent lesson
I trust you now see that the BOPPPS Model can work just as well online as it does face2face. Now you have the opportunity to use the BOPPPS model in your Synchronous Collaboration session. The same face2face lesson planning tool that is used throughout the PID Program. Lesson Plan Template
Additional Resources:
Queens University BOPPPS Model for Lesson Planning Infographic – https://www.queensu.ca/teachingandlearning/modules/active/18_boppps_model_for_lesson_planning.html
Looking forward to seeing your questions and comments on this implementation of the BOPPPS Model.


